Sunday, 13 January 2013

DIY: Sewing Machine Pincushion

AAAaaaaaarrrgh!!  After losing my pincushion for the gazillionth time today, I decided it was time to attach one to my sewing machine :D

Heres how! It's a great way to use up scrap fabric and yarn too :)

DIY:  Sewing Machine Pin-Cushion Tutorial @owlprintpanda.blogspot.co.uk


To make this project, you will need the following:

  • Scrap fabric
  • scrap yarn
  • crochet hook (which fits the yarn you have, roughly, no big deal)
  • needle and thread


DIY:  Sewing Machine Pin-Cushion Tutorial @owlprintpanda.blogspot.co.uk


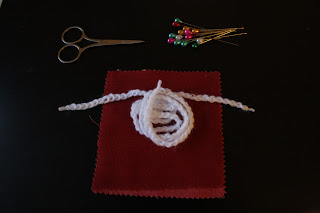
1. To start, crochet chains around 30cm long.  You will need two of these, one to attach to each side of your cushion!

DIY:  Sewing Machine Pin-Cushion Tutorial @owlprintpanda.blogspot.co.ukDIY:  Sewing Machine Pin-Cushion Tutorial @owlprintpanda.blogspot.co.uk


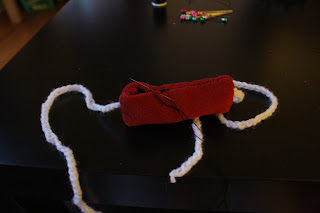
2.  Because you'll be wanting these strings on the outside once you're finished, be sure to tuck them inside your fabric when you fold it over to sew it together!  (Also remember to have your good side of the fabric on the inside, as we'll be turning this the right way round once we've sewn it together!)
DIY:  Sewing Machine Pin-Cushion Tutorial @owlprintpanda.blogspot.co.uk


3. Sew around your rectangle, though leave an inch to turn it all the right way round and stuff it.  Once stuffed with other scrap yarn or scrap fabric, sew the little opening shut.  When attaching this to your sewing machine, it can be on the bottom, so dont worry too much about your not-so-neat stitching :)


DIY:  Sewing Machine Pin-Cushion Tutorial @owlprintpanda.blogspot.co.uk

DIY:  Sewing Machine Pin-Cushion Tutorial @owlprintpanda.blogspot.co.uk


And you're done!!  Quick and easy!

Hope that was ok for everyone to follow, do comment below if anything is unclear! 

And lets see your little cushions!


Have a lovely evening!
Amanda :) x


1 comment:


Related Posts Plugin for WordPress, Blogger...