Showing posts with label fabric. Show all posts

Thursday, 30 May 2013

Carried Away With The Zippie Baggies

After showing you how to make those cute zippy pouches in the last post, I couldn't help but make some more!

Had a lovely day - I was up with the sun at 5.30am this morning, and studied my little head off so I could play with the fabric stash all afternoon :p

There are baggies in the shop now :D

Have you got any ideas for baggie themes you'd like to see?  Any favourite animals?  Drop me a wee comment!


Tuesday, 28 May 2013

DIY: Rectangle Zippy Pouch for Wooly stuff or Gadgety things!

I do love owls and I cannot lie, you other knitters can't deny, when a pouch sits there with some owls on its front and some stars inside its ... Insides...

My point is; how cute is this?!


Recently, I was asked by Rae of Fabric HQ to make a little tutorial and answer some of her lovely questions!   They have some really nice fabric (I may have to make another little entry on the 'stash shame' board...)

You can find my answers and my tutorial here on Rae's blog!

Let me know what you think!  I might be popping a few into the shop this weekend :p
Have you made any project bags recently?  What's you're favourite type?

x

Thursday, 4 April 2013

DIY: Sew Easy Project / Knitting Bag

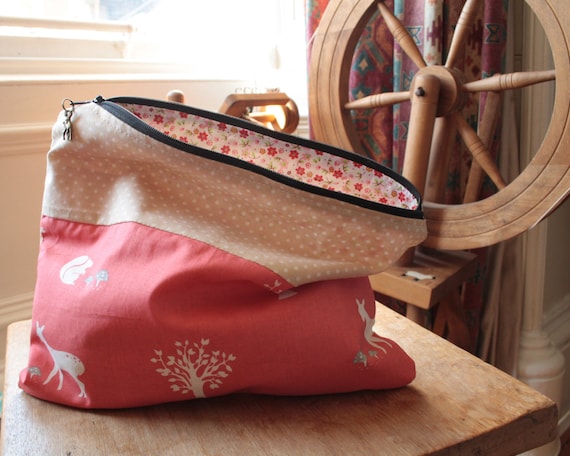
This pretty little quarter has been sitting on my desk for a while - it was too pretty to use!  So  what better way to be able to see your favourite fabric every day than to make it into a project bag?

I've taken far too many photos and written some instructions so you can make one too!

Been on nightshifts this week, and I am finding it very difficult to sleep when it's so sunshiney outside!  Sunshiney free time is for wandering outside with new red-riding hood and fox themed knitting baggies...


DIY:  Sew an Easy Project Bag @owlprintpanda.blogspot.co.uk


You will need:

  • any size of fabric, depending on the size of bag you want.  This one (which ends up roughly the same size as a sheet of A4 paper) began as a fabric quarter.  
  • ribbon or string for drawstring
  • scissors
  • needle & thread / sewing machine


1.  Since I've used a quarter, I just folded this in half inside out, but you can also cut two rectangles and pop these together (right sides facing).  The quarter was too long, so I chopped off around 5 inches from the top - my bag fabric at this point measured approximately 55 x 35 cm each side.


DIY:  Sew an Easy Project Bag @owlprintpanda.blogspot.co.uk


2.  Pin around the bottom and open side(s) of your bag.


DIY:  Sew an Easy Project Bag @owlprintpanda.blogspot.co.uk


3.  If you have folded a piece of fabric, cut ~3cm down the folded seam at the top of the bag, to allow you to fold the brim down to form a track for your drawstring.  When sewing your sides together, remember not to sew into this 3cm flap area, as it needs to allow your drawstring to pass out the side!


DIY:  Sew an Easy Project Bag @owlprintpanda.blogspot.co.uk

DIY:  Sew an Easy Project Bag @owlprintpanda.blogspot.co.uk


4.  After sewing the sides and bottom, pin down the top flaps to make your drawstring track.  Remember not to pin these right through both sides!  They only need to be sewn onto one side of the bag! - you don't wanna go sewing your bag shut.  Sew these flaps down - remembering to sew them only onto the side they're on and not to close the small gaps at the sides as your string will need to pass through here.


DIY:  Sew an Easy Project Bag @owlprintpanda.blogspot.co.uk

DIY:  Sew an Easy Project Bag @owlprintpanda.blogspot.co.uk
Stop here!  Don't sew the drawstring track shut!

DIY:  Sew an Easy Project Bag @owlprintpanda.blogspot.co.uk

DIY:  Sew an Easy Project Bag @owlprintpanda.blogspot.co.uk

DIY:  Sew an Easy Project Bag @owlprintpanda.blogspot.co.uk
I apologise for the terrible nail-polish job...

5. Cut two lengths of drawstring, each should be around 2x as long as the circumference of the bag (mine were ~1metre each, but this could probably be smaller).


DIY:  Sew an Easy Project Bag @owlprintpanda.blogspot.co.uk

6.  Feed your string through the drawstring track.  TIP:  tie the string to a knitting needle and pop this easily through the track, drawing your string with it!  Thread one in a loop through from left to right in the front track, and right to left in the back track.  Thread the other in the opposite direction (right to left in front track, left to right in back track).  


DIY:  Sew an Easy Project Bag @owlprintpanda.blogspot.co.uk

DIY:  Sew an Easy Project Bag @owlprintpanda.blogspot.co.uk

DIY:  Sew an Easy Project Bag @owlprintpanda.blogspot.co.uk

7.  Tie your drawstrings into a knot at the ends, turn your bag the right way round, and pull!  One project bag!

DIY:  Sew an Easy Project Bag @owlprintpanda.blogspot.co.uk

DIY:  Sew an Easy Project Bag @owlprintpanda.blogspot.co.uk
 
DIY:  Sew an Easy Project Bag @owlprintpanda.blogspot.co.uk

DIY:  Sew an Easy Project Bag @owlprintpanda.blogspot.co.uk


If you make a project bag, please do send me in your links and photos!  Just pop a comment below or e-mail me if you'd like me to pop a link onto the page!

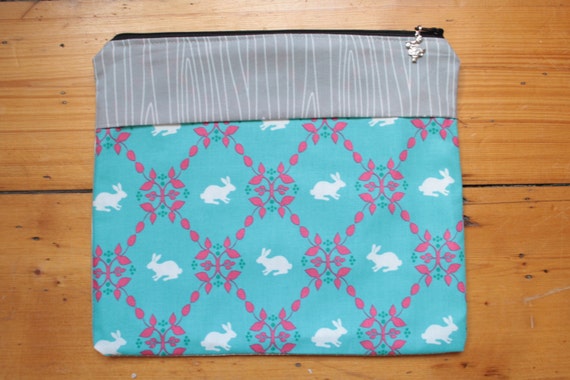
Aaaa is so cute!  I'ma gonna go stare at it again for a wee while...


I've also made a couple of other pretties, but we shall save those for another day :p

DIY:  Sew an Easy Project Bag @owlprintpanda.blogspot.co.uk

DIY:  Sew an Easy Project Bag @owlprintpanda.blogspot.co.uk


Sunday, 13 January 2013

DIY: Sewing Machine Pincushion

AAAaaaaaarrrgh!!  After losing my pincushion for the gazillionth time today, I decided it was time to attach one to my sewing machine :D

Heres how! It's a great way to use up scrap fabric and yarn too :)

DIY:  Sewing Machine Pin-Cushion Tutorial @owlprintpanda.blogspot.co.uk


To make this project, you will need the following:

  • Scrap fabric
  • scrap yarn
  • crochet hook (which fits the yarn you have, roughly, no big deal)
  • needle and thread


DIY:  Sewing Machine Pin-Cushion Tutorial @owlprintpanda.blogspot.co.uk


1. To start, crochet chains around 30cm long.  You will need two of these, one to attach to each side of your cushion!

DIY:  Sewing Machine Pin-Cushion Tutorial @owlprintpanda.blogspot.co.ukDIY:  Sewing Machine Pin-Cushion Tutorial @owlprintpanda.blogspot.co.uk


2.  Because you'll be wanting these strings on the outside once you're finished, be sure to tuck them inside your fabric when you fold it over to sew it together!  (Also remember to have your good side of the fabric on the inside, as we'll be turning this the right way round once we've sewn it together!)
DIY:  Sewing Machine Pin-Cushion Tutorial @owlprintpanda.blogspot.co.uk


3. Sew around your rectangle, though leave an inch to turn it all the right way round and stuff it.  Once stuffed with other scrap yarn or scrap fabric, sew the little opening shut.  When attaching this to your sewing machine, it can be on the bottom, so dont worry too much about your not-so-neat stitching :)


DIY:  Sewing Machine Pin-Cushion Tutorial @owlprintpanda.blogspot.co.uk

DIY:  Sewing Machine Pin-Cushion Tutorial @owlprintpanda.blogspot.co.uk


And you're done!!  Quick and easy!

Hope that was ok for everyone to follow, do comment below if anything is unclear! 

And lets see your little cushions!


Have a lovely evening!
Amanda :) x


Related Posts Plugin for WordPress, Blogger...